Table of Contents
Microsoft Stream is an enterprise video management service that’s included with TWU's suite of Microsoft 365 apps. Microsoft 365 applications and services, including Microsoft Stream, are constantly improving to provide users with the best experiences and productivity options. As a result, Microsoft is retiring the current version of Microsoft Stream (Classic) in April 2024.
New Stream Interface
Microsoft has updated the way it manages videos with the new Stream interface. Users can upload and share videos from OneDrive, SharePoint and other locations in the MS 365 ecosystem. The new Stream home page is stream.office.com. From this page you can upload videos, record and manage playlists. Please see Features in Microsoft Stream for more information.
Note: It's recommended to start uploading videos to
OneDrive in organized folders for each of the courses or subject areas your videos are related to. See
Uploading a Video for more details.

What's the difference between Stream Classic and Stream on SharePoint?
Stream (Classic) is a standalone service whereas Stream (on SharePoint) is fully integrated with Microsoft 365 apps and services. With Stream (on SharePoint) you can record, upload, discover, share, and manage video files stored right in the apps and services you already use today such as SharePoint, OneDrive, Teams and Office.
- For all videos, sharing permissions must be set. By default videos are not viewable by anyone but the video owner.
Migration from Stream (Classic) to Stream (on SharePoint)
TWU IT has begun migrating existing Stream (Classic) videos to Stream (on SharePoint) this August, 2023, through an automated migration process. Stream (Classic) video owners were notified in July 2023 to ensure they were fully informed before any migration activities commenced. Once videos have migrated over, videos in the old Stream Classic interface will no longer be editable or shareable in Stream Classic.
Where to Find Videos After Migration
Videos that were saved in a user's "My Content" area in Stream (Classic) have been migrated to the user's TWU OneDrive, in a folder labelled "Stream Migrated Videos". Videos that were uploaded to a Teams Group such as semester based Course group will be located in the Site Files of the associated MS Team's SharePoint site OR in the Shared area of the user's OneDrive.
Note: The Office 365 Dashboard looks similar to OneDrive but has fewer options for managing files.

How to find migrated videos (Personal Videos)
Follow these steps to locate personal videos that were previously in the "My Content" area of Stream Classic,
- Go to https://OneDrive.com
-
Sign in with your TWU email account and password

-
Navigate to "My Files"
-
Locate the "Stream Migrated Videos" folder

How to find migrated videos (Videos located in Teams Groups or Stream Channels)
For videos that were uploaded to Stream (Classic) Channels or Groups (as well as Teams groups) follow these steps:
- Go to https://OneDrive.com
-
Sign in with your TWU email account and password
-
Navigate to "Quick Access" area on the left panel.
-
Click on the "More Places" link
-
Find your course related Teams group or channel (channels are within Teams Groups) - e.g. HKIN 191 FA 2023
-
Go to the Site Files area and locate the "Stream Migrated Videos" folder

Microsoft Stream videos are now hosted on Microsoft file services such as OneDrive, SharePoint file directory or Teams files. Anytime you upload a video to any of these platforms, it automatically becomes a playable Stream video in a browser, with a similar video player interface as with Stream Classic (e.g. transcripts are shown on the side).
To upload a video, follow these directions based on the different platforms you may want to use.
OneDrive hosted videos
You can organize and store videos in your personal TWU OneDrive, which can sync to your desktop, and be shared later with specific groups, students or faculty/staff. These videos can also be linked into Moodle (see sections below).
1. Navigate to OneDrive either on your Desktop (if OneDrive is synced to your TWU device), or on a browser.
a. For PC Desktop: Navigate to File Explorer (Windows button - E) or click on the OneDrive icon on the bottom left, then navigate to a specific folder you want to upload to, or create a new folder.
b. For OneDrive on a Browser: Navigate to either https://onedrive.com and sign in with your TWU email, or go to https://office.com --> Apps --> OneDrive.
2. Move or upload a video to the folder of your choice.
a. For Desktop synced OneDrive: Move or copy a video into a folder of your choice, in any subfolder of OneDrive. Make sure there is a green check mark next to the file.:

b. For OneDrive on a Browser: Drag files to the folder area of your choice, or click on Add new --> File upload.

3. Once the movie file (e.g. .mp4 or .mov format) is uploaded, it will appear in OneDrive on a browser with a Stream icon, and you will now be able to open it in the Stream video player interface:

The new stream file will be playable in a browser window and have a number of features, including Video Settings, Share and other features.

For a full list of Stream video features, please see: Learn More about Stream (on SharePoint).
If you'd like your videos to be viewable by others, you must manage access for each video, or for the folder which the video is located in. Any folder sharing settings will cascade down to each video in that folder.
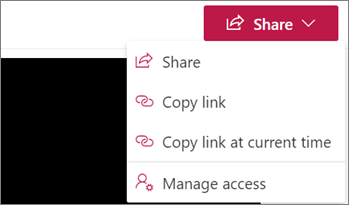
To share videos:
-
In OneDrive (or Sharepoint) Open a video or audio file.
-
Select Share and choose an option:
-
Share - recipients you share with will receive an email with a link to the video or audio file.
-
Copy link - a link to the file is created, which you can share however you want, like in a chat message or document.
-
Copy link at current time - a link to the file is created to the current time in the video or audio file you have open. This link is shareable however you want, like in a chat message or document.
-
Manage Access (use this option when embedding): Grant access to a group of people, like a Course Teams Group.
-
To add a group of students from a specific semester-based course to view a video (or folder where a number of videos need to be shared), click on Manage Access --> Grant Access:

-
Search for the semester-based Course that you want to share the video/folder with:

-
Once you find the course, select it, and ensure you have the "view" icon toggled (not the pencil icon which allows for editing the video).
-
Uncheck "Notify people", then click "Grant Access"

-
Students from that course group can now view the videos when you share either individual links with the group, or share / embed the videos in Moodle courses
Tips:
-
To make your video viewable TWU-wide grant access to the group named "Everyone except external users".

-
You can also share directly from your OneDrive or SharePoint without opening the video or audio file. Open the file or select the three dots next to the file name and choose Share or Copy link.

Generating Transcripts
- Click on Video Settings, then select "Transcript and Captions". Generate captions for the video:

Adding Thumbnails
Click on Video Settings --> Thumbnail to add a custom thumbnail. Click on the up arrow to upload the new thumbnail:

To find out more about Video Settings, including adding Chapters, Comments and more, please see: Learn More about Stream (on SharePoint).
Linking Videos in Moodle
Warning: In order to share a video link, sharing permissions must be set. See Sharing Videos (Permissions) for more details.
Copying a Video Link
To copy a video link, that already has permissions set (see Sharing Videos (Permissions)), go to the OneDrive folder where the video is located, click on the three dots next to the video and select "Copy Link":

In the pop-up window, click Copy to copy link to clipboard:

Adding a Stream Video Link in Moodle
1. Open your Moodle course, and ensure Edit Mode is on (toggle top right Edit mode button to the right).
2. At the bottom of a section (topic) of the course, click on "Add an activity or resource"

3. Select either URL, Text and media area, page, or any other tool that allows you to paste a hyperlink. For the sake of this demonstration, we will choose URL

4. Paste the link in the External URL area, then under Appearance, it's recommended you select "New Window" so the video can be viewed in a new window:

Note: Users can also paste Stream video links as hyperlinks in Pages, Assignment description areas, or in the Text and media area tool.
Warning: To embed a video, access to the video must be granted. See Sharing Videos (Permissions) for more details.
If you would like your videos to play directly within Moodle without having students need to open the videos in a new browser, follow these instructions:
Generate and Copy the Embed Code
- Go to your video in OneDrive
- Open the video in Stream (click on video or right click and select Open --> Open in Stream)
- Click on the Share button, then select "Embed code"

Open Moodle
You now need to paste the embed code into Moodle. We recommend that you have your Moodle course open on a separate tab next to the Stream video tab.
Navigate to Course Section
- Select a section or Topic area where you want the video to show to students
- Ensure Edit Mode is on (toggle Edit Mode on top right of screen)
- Add an Activity or resource --> Text and Media area (previously: Label in older versions of Moodle)

Locate "Edit HTML Source" button
Use 'CTRL V' (Command V for macOS users) to paste the embed code, then click 'Update'. Then scroll down and click 'Save and return to course'.

Your Videos are in Moodle
Once you have embedded the video into your course, your video will be playable and viewable by students.

Note: You can also embed videos in Sections (Edit Section --> Add embedded video to description), or in Pages, or in Assignment description areas, as all these text areas have the "Edit HTML Source" button